Part of being a safe IFR pilot is conducting a proper instrument approach briefing. An approach plate is filled with critical information that you must know prior to shooting an approach.
Wether you are a commercial pilot or a general aviation pilot you should develop a methodical way to brief the approach and keep it the same each and every time. If you stay consistent, you won’t miss any important information on the approach plate.
Common mistakes you can avoid by conducting a proper approach briefing are:
- Obstacle and terrain collision
- Use of the wrong navigational aids
- Wrong runway or approach course
- Violating regulations
I like to start my approach briefing early, while still on the ground. After I go through a full flight plan briefing, I have an idea what approach to expect based off the weather and the NOTAMs that are in effect at my destination airport. Based off that, I review the approach plate for the approach I expect. Of course, I make sure that the approach plate and all of my downloads in ForeFlight are up to date!

Briefing in flight
As I near my destination airport, I will pick up the ATIS or AWOS, which tells me what approach is in use. I pull up that approach plate and begin my brief. Now this involves some multi-tasking. The airplanes I fly are equipped with some nice GPS equipment, which makes shooting an instrument approach a little easier.
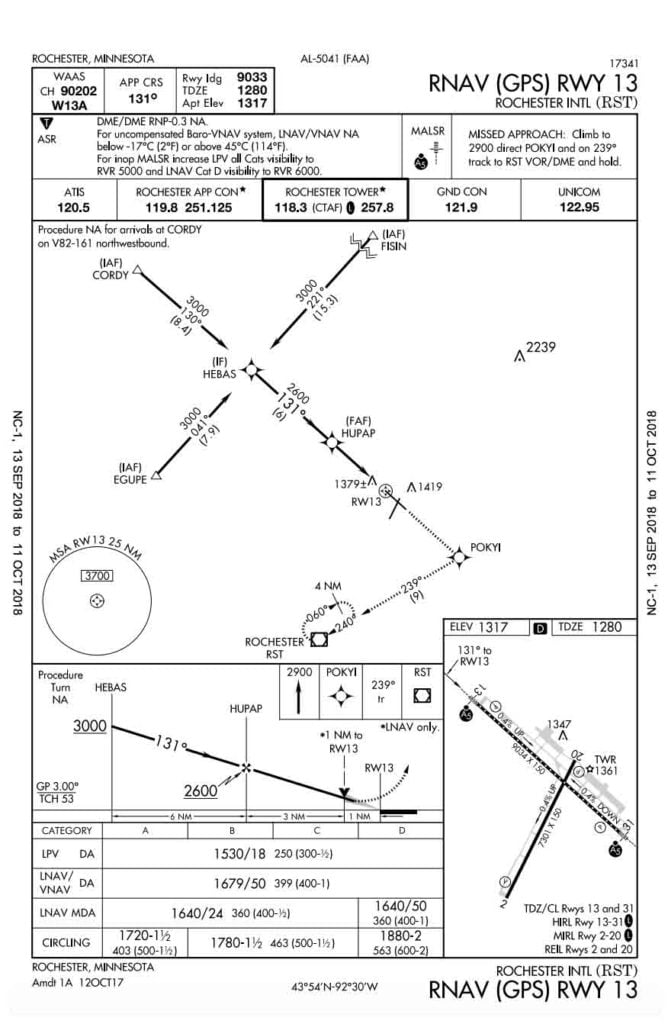
Now for the purpose of this article, I have selected the RNAV (GPS) RWY 13 at Rochester International Airport (RST).
With the approach plate loaded, I begin my approach brief. I like to break the brief into sections to make it more manageable and to be sure that I don’t miss anything. This is important!
Section 1 | Pilot Briefing
I start on the upper right side of the approach plate and work my way to the left. So lets get to it and brief this approach.
- My approach is the RNAV (GPS) 13 at Rochester International Airport. I go to my GPS unit, and select the RNAV RWY 13 approach at RST and load the approach. I also make sure that my CDI is set to GPS and not VLOC since this is a GPS approach.
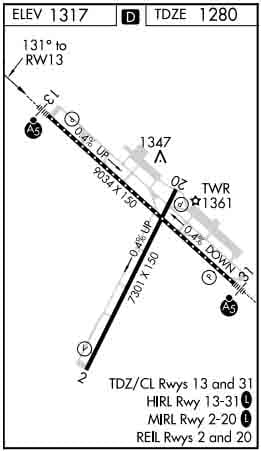
- I have a 9,033 foot runway with a touchdown zone elevation of 1208′ MSL and an airport with an elevation of 1317’MSL.
- My approach course is 131 degrees. I set my OBS to 131 degrees in preparation for the approach. I do this for 2 reasons. Number one, I want to get as much workload out of the way so there is less for me to do later and number two, consistency. Although an RNAV approach doesn’t require the OBS be set, ILS and VOR approaches do. So if I do everything the same every time, there will be less chance of something going a rye.
- The approach is a WAAS approach, which means, in the aircraft I fly, I can go down to LPV minimums. Be sure to check and know what type of equipment you have in your aircraft because it matters for your minimums!
- Here there are alternate takeoff minimums, ASR available, and some notes about DMW, temperature and visibility.
- I review my runway lighting, as another measure when I am on my final approach that I see the correct lighting, which will be another indicator that I am on the correct course.
- Should I miss the approach, my instructions are to climb to 2900 direct to the POKYI intersection and 239 degree track to the RST VOR/DME and hold. Now it should be noted that this is a towered airport in class D airspace. Often times the controllers will give you instructions different than what is published here. That is fine. All you have to do is follow their instructions as they are very helpful when in the soup.
- I go through all the radio frequencies I will need for this approach and start plugging them into my communication radios. That way when they hand me off, I can push one button to switch over to the next frequency and not have to worry about trying to dial in the correct frequency, thus decreasing my workload. It is also worth mentioning that the frequencies are in the order that they will be used. First starting with the ATIS, then approach control, then tower, followed by ground control.
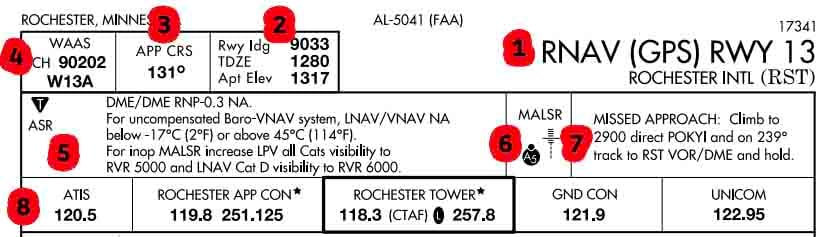
Section 2 | Plan View
The next section of the approach briefing is the plan view. This shows an overview of the approach area in the form of a birds eye view. One of the first things I like to look at is my minimum safe altitude (MSA). This is important because I need to know what the minimum altitude I can descend to without hitting anything. In this case it is 3700 within 25 nautical miles from runway 13. In some cases, the approach controller will give you lower than MSA, which is okay, because they are going to ensure that you won’t hit anything as they watch you on radar.
The intersections highlighted in the red bubble are the initial approach fixes. Depending on the direction you are coming from or if you are getting vectored from air traffic control, will determine what initial approach fix you will choose. You may have noticed that there are four different initial approach fixes. EGUPE, CORDY and FISIN are essentially feeder fixes for HEBAS, which is the final approach fix that is in line with the runway.
The intersection highlighted in the yellow bubble is the final approach fix and the intersection highlighted in the purple bubble is the missed approach fix that you should fly to upon missing the approach. As you can see it is a 131 degree heading to the fix and then a 239 degree heading to the RST VOR/DME as explained in section 1 when we briefed the missed approach procedure.
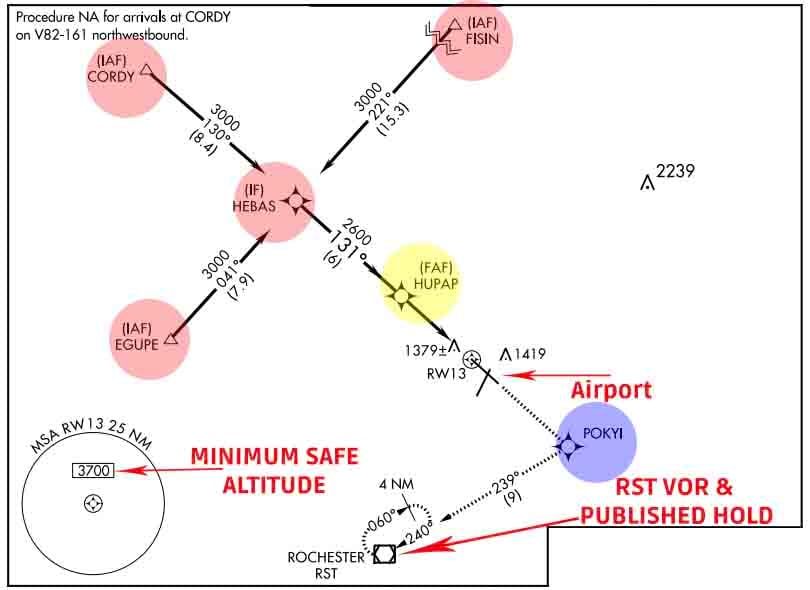
Section 3 | Profile View
Here we see the profile view, which gives you a side view of the approach. In this portion of the brief, there is some very critical information. As you can see here HEBAS is the initial approach fix (in red) and HUPAP the final approach fix (in yellow). Notice the underlined numbers, highlighted in green. These numbers are the absolute minimum altitude in MSL that you can descend to. So you must stay at or above 3000 feet MSL until you cross HEBAS, then you can descend to 2600 feet MSL until you cross HUPAP.
RW13, which is the runway and the dotted line indicates the missed approach procedure. Above that, highlighted in purple is the missed approach procedure. This is saying that if you miss the approach, you need to climb to 2900 feet MSL, proceed direct POKYI, then track 239 degrees to the RST VOR/DME.
Section 4 | Minimums
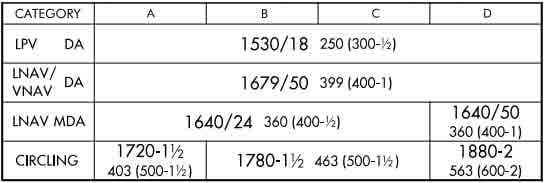
It is important to know what category your particular airplane falls under. For this approach briefing, we are flying a Piper Archer III with an approach speed less than 91 knots. This puts us into category A.
- Category A: 91 knots or less
- Category B: 91 knots or more but less than 121 knots
- Category C: 121 knots or more but less than 141 knots
- Category D: 141 knots or more but less than 166 knots
Now as I mentioned before, this aircraft is equipped with a WAAS GPS, which means that we can go down to the LPV minimum. So our minimum altitude is 1530 feet MSL with a horizontal visibility of 1800 feet.
Section 5 | Airport Diagram
The last and final section of the brief is the airport diagram, which should be reviewed prior to arriving at your destination.
So there you have it, that is how to properly brief an instrument approach. Don’t take shortcuts and make sure you brief the entire approach plate as there is important information on there that you will need to fly the approach!